Create and remove Azure Container Instances from a TeamCity build
November 2018
Overview
This post will go through the process of how to create a container in an Azure Container Instance Groups from a TeamCity build job.
The requirement came up recently to be able to test certain steps of a build against an application running in a linux container. The build agents are Windows hosts (to build full DotNet applications) that run on EC2. The original plan of using docker on the agent to run a linux container to test against didn’t work because running linux containers on a Windows host requires hyper-v to be installed, which after contacting AWS support was informed couldn’t be done. There was a work around in place but it was reported that this had mixed results.
I looked around at some other solutions and watched the channel9 video on Azure container instances which perked my interest.
After checking the Azure Container Instances docs and the how to get started with PowerShell section, I created, connected to and removed the container and was pleased at how simple it was:
# Create Nginx Container with date time for unique DNS name

$ResourceGroupName = 'container-demo'
$Location = 'northeurope'
$date = Get-Date -Format yyyyMMddHHMMss
$ContainerGroupName = "nginx"
$DnsName = "$ContainerGroupName-$date"
$OsType = 'Linux'
$Port = '80'
$ContainerImage = 'nginx'

New-AzureRMResourceGroup -Name $ResourceGroupName -location $location

$containerGroupParams = @{
  'ResourceGroupName' = $ResourceGroupName;
  'Name'              = $ContainerGroupName;
  'Image'             = $ContainerImage;
  'DnsNameLabel'      = $DnsName;
  'OsType'            = $OsType;
  'Port'              = $Port
}

New-AzureRmContainerGroup @containerGroupParams

Remove-AzureRmContainerGroup -ResourceGroupName $ResourceGroup -Name $ContainerGroupName
With it being that easy, I came up with the plan to use this as part of a TeamCity build job which would involve:
- Authenticating to Azure
- Creating the container
- Running the tests against the container
- Removing the container
- Removing the Azure session
Because the build agents are running in AWS, I had to create a service principal to connect to Azure and run the PowerShell commands. I will cover:
- Creating a Service Principal with a Certificate
- Giving the service principal just enough permissions to a resource group via a custom Azure role to create and remove containers
- Setting up TeamCity build steps and parameters to connect to Azure, create, test against and remove then container the remove the Azure session
- The PowerShell scripts to run in item 3.
The examples in this post were carried out using PowerShell Desktop Version 5.1 on Windows 10 1803.
Azure Service Principal with Certificate
First I create the Azure Service Principal following the documentation. I wanted to use a certificate for the Service Principal authentication because I had not done this before and wanted to learn the process. Jetbrains also advise to avoid storing passwords for external accounts in TeamCity in this response from support. There’s also this issue tracker that shows they are working on improving security of secrets held.
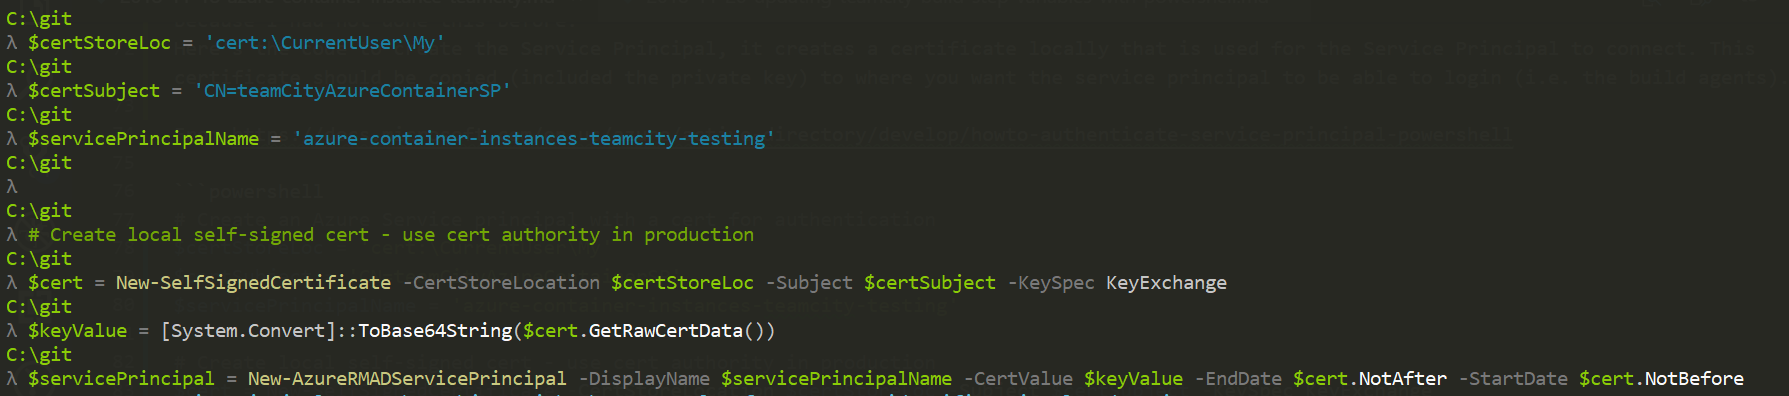
Here’s the code to create the Service Principal, it creates a local self-signed certificate that is used for the Service Principal to connect. This certificate should be copied (included the private key) to where you want the service principal to be able to login (i.e. the build agents).
# Create an Azure Service principal with a cert for authentication
$certStoreLoc = 'cert:\CurrentUser\My'
$certSubject = 'CN=teamCityAzureContainerSP'
$servicePrincipalName = 'azure-container-instances-teamcity-testing'

# Create local self-signed cert - use cert authority in production
$cert = New-SelfSignedCertificate -CertStoreLocation $certStoreLoc -Subject $certSubject -KeySpec KeyExchange
$keyValue = [System.Convert]::ToBase64String($cert.GetRawCertData())

Connect-AzureRMAccount

# Create the service principal with the certificate just created
$servicePrincipal = New-AzureRMADServicePrincipal -DisplayName $servicePrincipalName -CertValue $keyValue -EndDate $cert.NotAfter -StartDate $cert.NotBefore
Start-Sleep 20
Above code adapted from the Service Principal Docs

This creates the AzureAD application and Service Principal that will be used by the TeamCity build step to authenticate to Azure.
Don’t forget that you’ll have to import the certificate to the build agent or other machines where you want the Service Principal to be able to authenticate to Azure.
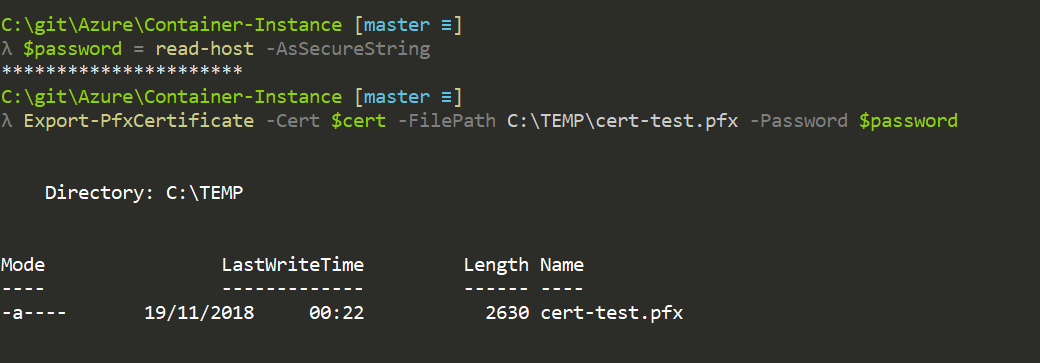
Export the cert with the private key
$password = read-host -AsSecureString
Export-PfxCertificate -Cert $cert -FilePath C:\TEMP\cert-test.pfx -Password $password -Force
Import the cert using the password used to export it
 # Local machine so build agent account can access it
 $password = Read-Host -AsSecureString
 Import-PfxCertificate -FilePath .\cert.pfx -Password $password -CertStoreLocation Cert:\LocalMachine\My\

Azure custom role for Container Instances
Next step is to limit what the Service Principal can do in the Azure subscription(s). I like to limit to a specific resource group and will create a custom role that limits the Service Principal to be able to take actions on container instance groups within the resource group and nothing else.
First the policy below should be saved as a JSON document. In the Assignable Scope property, update with the subscription ID. This policy allows the Principal to carry out any action against the container groups but could be locked down even further if required.
Update subscription-id-here with Azure SubscriptionID (You can use to following Cmdlet to get it: Get-AzureRmSubscription).
{
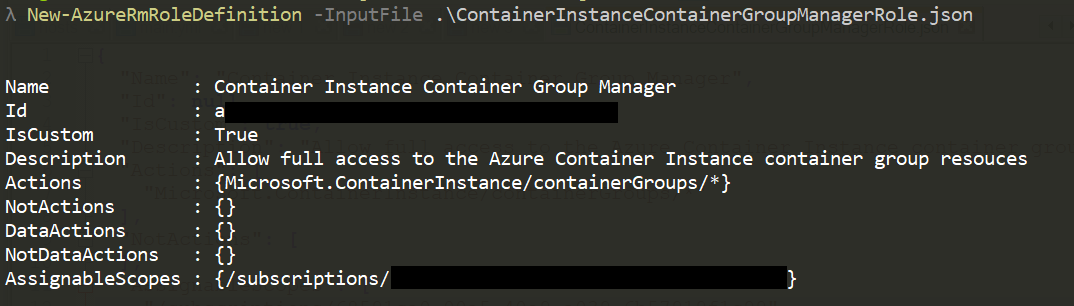
"Name": "Container Instance Container Group Manager",
"Id": null,
"IsCustom": true,
"Description": "Allow full access to the Azure Container Instance container group resources",
"Actions": [
"Microsoft.ContainerInstance/containerGroups/*"
],
"NotActions": [
],
"AssignableScopes": [
"/subscriptions/subscription-id-here"
]
}
New-AzureRmRoleDefinition -InputFile .\ContainerInstanceContainerGroupManagerRole.json
How to find the namespace for roles
Get-AzureRmProviderOperation | where-object {$_.Operation -like "Microsoft.ContainerInstance/containerGroups*"} | select-object -property operation
Operation
---------
Microsoft.ContainerInstance/containerGroups/read
Microsoft.ContainerInstance/containerGroups/write
Microsoft.ContainerInstance/containerGroups/delete
Microsoft.ContainerInstance/containerGroups/restart/action
Microsoft.ContainerInstance/containerGroups/stop/action
Microsoft.ContainerInstance/containerGroups/start/action
Microsoft.ContainerInstance/containerGroups/containers/logs/read
Container Instance Action Types
Assign roles to the Service Principal
Be patient after assigning the role, usually it takes place instantly but I have been caught out a couple of times when it took a little longer to propagate through. A good sign that it has propagated is if it shows up in the portal under the resource group IAM blade.
# Apply custom role and reader role at the resource group level
$roleDefName = 'Container Instance Container Group Manager'
$resourceGroup = 'tc-containers'

New-AzureRmRoleAssignment -ObjectId $servicePrincipal.Id -RoleDefinitionName $roleDefName -ResourceGroupName $resourceGroup
New-AzureRmRoleAssignment -ObjectId $servicePrincipal.ApplicationId -RoleDefinitionName 'reader' -ResourceGroupName $resourceGroup

PowerShell Scripts
Below are the PowerShell scripts that correspond with the TeamCity build steps. The parameters are passed to the scripts by TeamCity at build time.
The scripts and build do the following:
- Authenticate with Azure using the service principal
- Create a container instance group with the specified container
- Run a simple test against the container
- Remove the container
- Remove the authenticated Azure session
1: Authenticate to Azure with the service principal.
param(
  [Parameter(Mandatory = $true)]
  [String]
  $ApplicationId,
  [Parameter(Mandatory = $true)]
  [String]
  $TenantId,
  [Parameter(Mandatory = $true)]
  [String]
  $Thumbprint,
  [Parameter(Mandatory = $true)]
  [String]
  $ContextNameS
)

$authParams = @{
  'ServicePrincipal'      = $true;
  'CertificateThumbprint' = $Thumbprint;
  'ApplicationId'         = $ApplicationId;
  'Tenant'                = $TenantId;
  'ContextName'           = $ContextName
}

Connect-AzureRmAccount @authParams
2: Create the Container Group Instance
param(
  [Parameter(Mandatory = $true)]
  [String]
  $ResourceGroup
)

$prefix = -join ((97..122) | Get-Random -Count 5 | ForEach-Object {[char]$_})
$date = Get-Date -Format yyyyMMddHHMMss
$ContainerGroupName = "tc-testing-containers-$date"
$DnsName = "$prefix-$date"
$OsType = 'Linux'
$Port = '80'
$ContainerImage = 'nginx'

$containerGroupParams = @{
  'ResourceGroupName' = $ResourceGroup;
  'Name'              = $ContainerGroupName;
  'Image'             = $ContainerImage;
  'DnsNameLabel'      = $DnsName;
  'OsType'            = $OsType;
  'Port'              = $Port
}

$containerGroup = New-AzureRmContainerGroup @containerGroupParams

while ((Get-AzureRmContainerGroup -ResourceGroupName $ResourceGroup -Name $ContainerGroupName).State -ne 'running') {
  Write-Output "Container state is: $((Get-AzureRmContainerGroup -ResourceGroupName $ResourceGroup -Name $ContainerGroupName).State)"
  Start-Sleep -Seconds 5
}

Write-Output "Container is: $((Get-AzureRmContainerGroup -ResourceGroupName $ResourceGroup -Name $ContainerGroupName).State)"

# Test that the after the container is running, wait until we can get a TCP connection on the container
while ((Test-NetConnection -ComputerName $containerGroup.Fqdn -Port $Port).TcpTestSucceeded -ne 'True') {
  Write-Output 'Waiting for Nginx'
  Start-Sleep -Seconds 5
}

# Update the TeamCity build parameters for use in later build steps
"##teamcity[setParameter name='containerGroupName' value='$ContainerGroupName']"
"##teamcity[setParameter name='containerUrl' value='$($containerGroup.Fqdn)']"
3: Run a simple test against the container
param(
  [Parameter(Mandatory = $true)]
  [String]
  $ContainerUri
)

Write-Output $ContainerUri

$result = Invoke-WebRequest -UseBasicParsing -Uri $ContainerUri

Write-Output $result

if ($result.Content.Contains('Thank you for using nginx.')) {
  Write-Output 'Success, the website has the correct wording'
  Return 0
} else {
  Write-Output 'Failure, the wording on the website is wrong'
  Return 1
}
4: Remove the container instance group
param(
  [Parameter(Mandatory = $true)]
  [String]
  $ResourceGroup,
  [Parameter(Mandatory = $true)]
  [String]
  $ContainerGroupName
)

Remove-AzureRmContainerGroup -ResourceGroupName $ResourceGroup -Name $ContainerGroupName
5: Remove the session
param(
  [Parameter(Mandatory = $true)]
  [String]
  $ContextName
)

Disconnect-AzureRmAccount -ContextName $ContextName
TeamCity Build Job
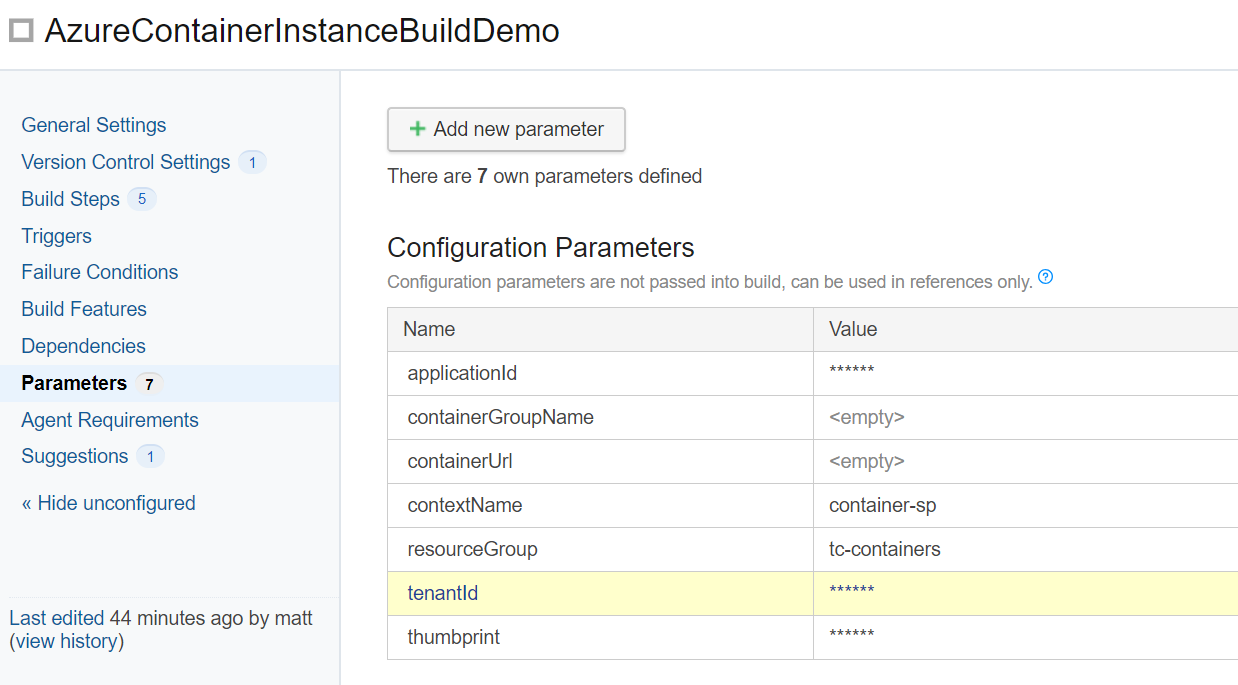
Parameters
The Configuration Parameters are set as follows:
- applicationId - password - The ID of the Service Principal
- containerGroup - string - Empty = updated by the PowerShell scripts using the service message to be used in later build steps
- containerUrl - string - Empty = updated by the PowerShell scripts using the service message to be used in later build steps
- contextName - string - Name of the context used for the authentication to Azure
- resourceGroup - string - Name of the resource group the Service Principal has authorisation to create and remove container instances
- tenantId - secure password - tenant ID of the Azure subscription
- thumbprint - secure password - thumbprint of the certificate
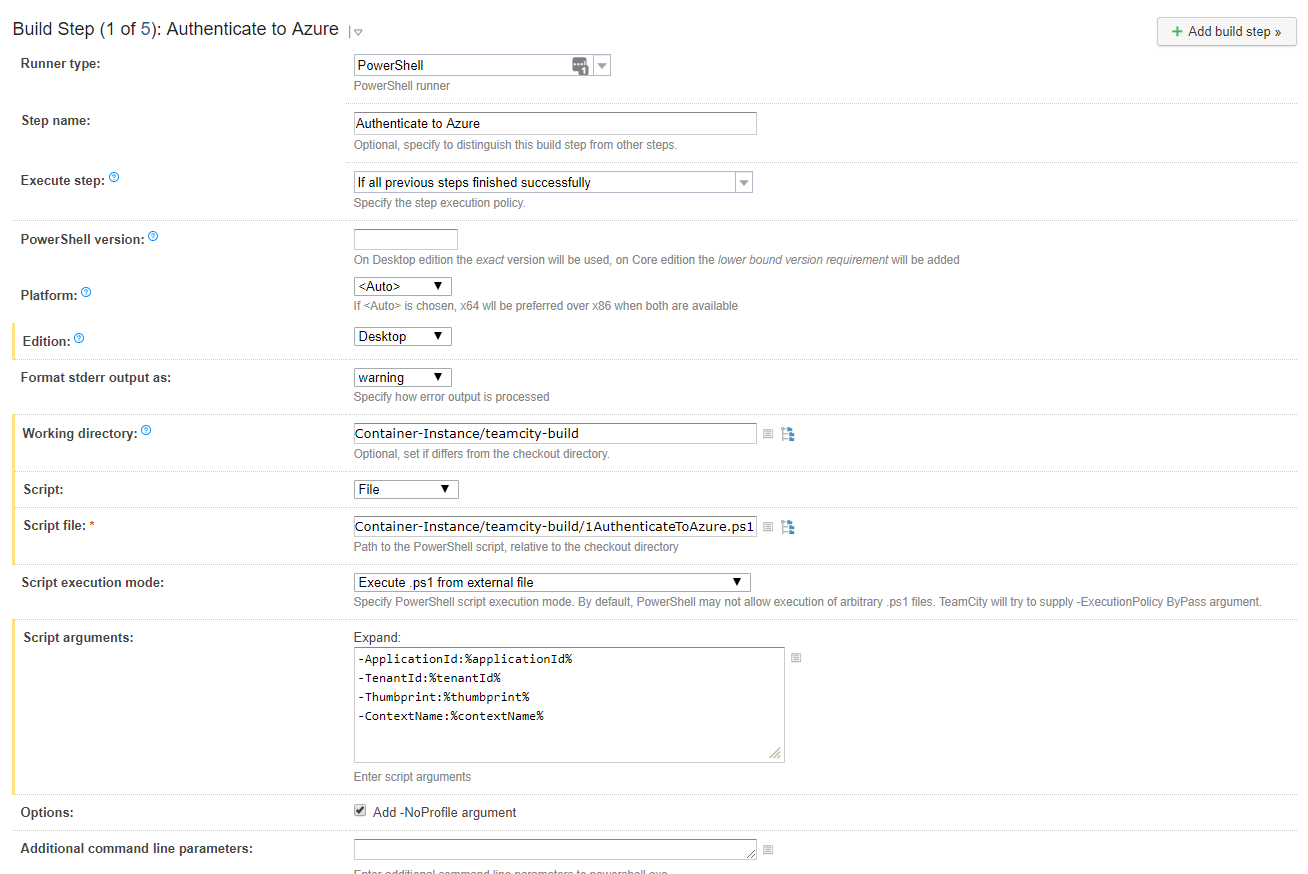
Build Step 1
- Runner Type: PowerShell
- Name: Authenticate to Azure
- Execute step: If all previous steps finished successfully
- PowerShell Version: left blank
- Platform: Auto
- Edition: Desktop
- Format stderr output as: Warning
- Working directory: Container-Instance/teamcity-build
- Script: File
- Script File: Container-Instance/teamcity-build/1AuthenticateToAzure.ps1
- Script execution mode: Execute .ps1 file from external file
- Script arguments:
- -ApplicationId:%applicationId%
- -TenantId:%tenantId%
- -Thumbprint:%thumbprint%
- -ContextName:%contextName%
- Options: Add -NoProfile argument = checked
- Additional command line parameters: blank
- Run Step with docker container: blank
The rest of the build steps have a similar setup as build 1, with different file paths etc. For brevity I will just list the script arguments of the following steps.
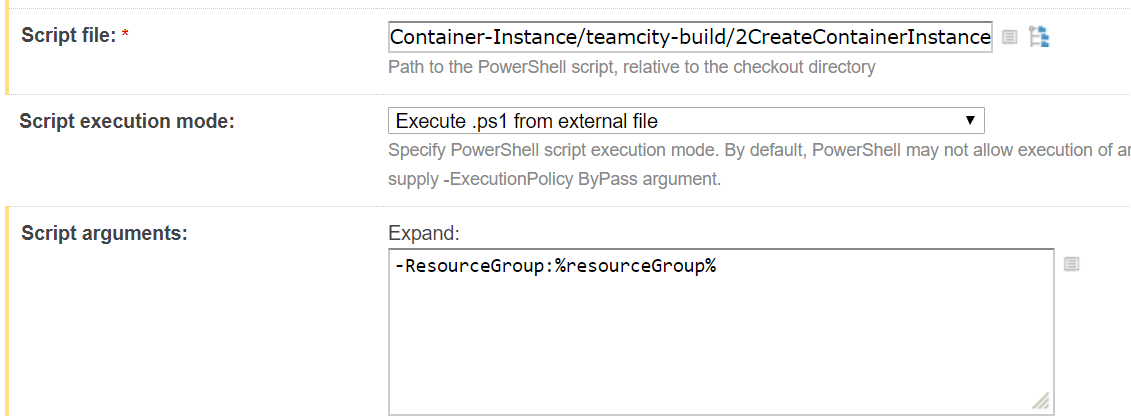
Build Step 2
- Script Arguments:
- -ResourceGroup:%resourceGroup%
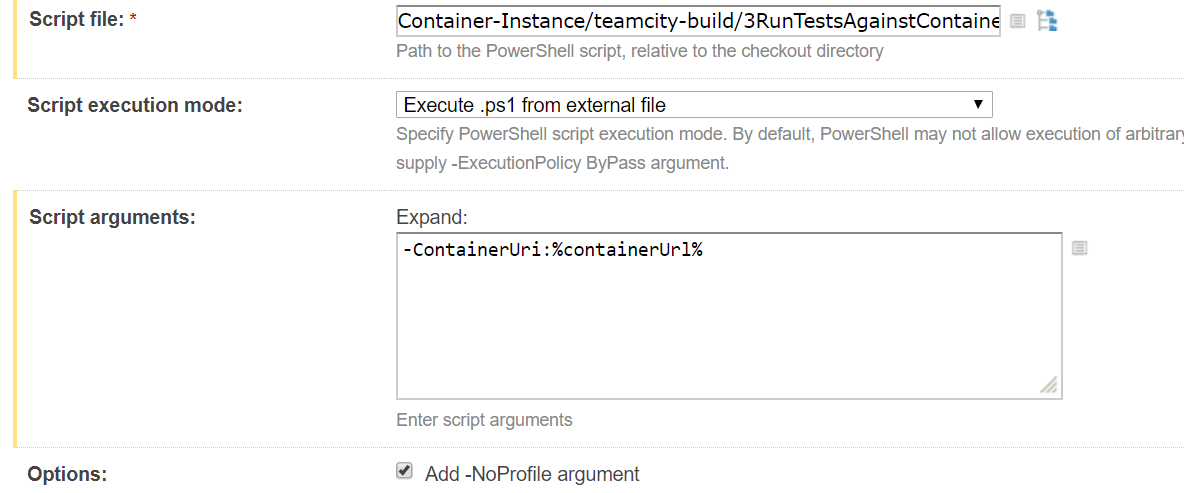
Build Step 3
- Script Arguments:
- -ContainerUri:%containerUrl%
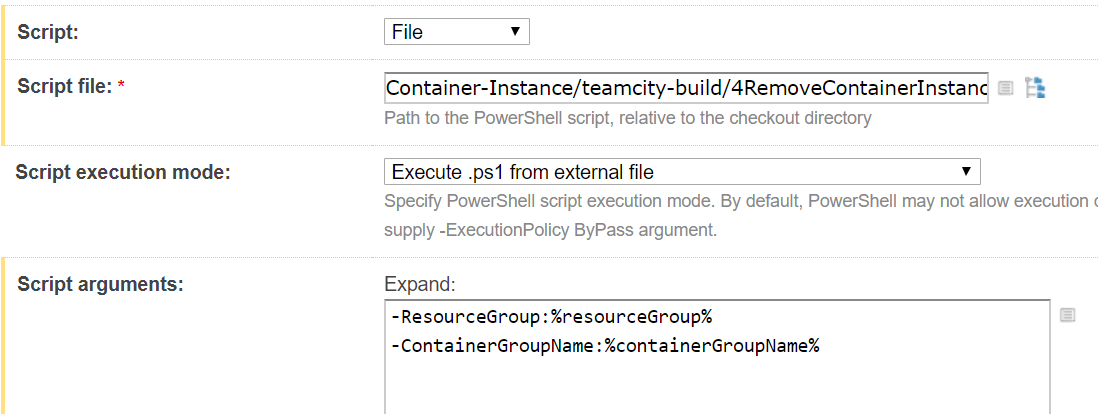
Build Step 4
- Script Arguments:
- -ResourceGroup:%resourceGroup%
- -ContainerGroupName:%containerGroupName%
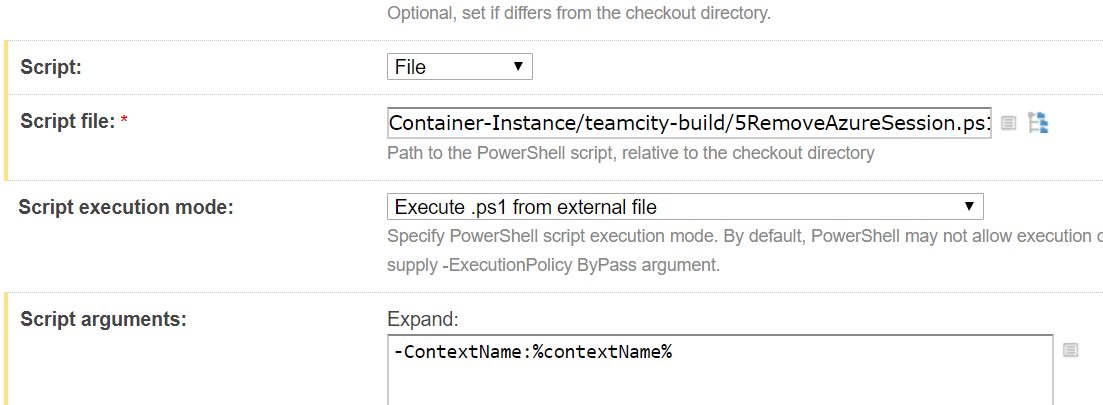
Build Step 5
- Script Arguments:
- -ContextName:%contextName%
This blog post was extremely helpful in working out how to pass the build parameters to the PowerShell scripts.
Summary
Azure Container Instances make it really easy to spin up a container without the overhead of setting up and managing the underlying hardware. The service is great for this use case of spinning up a container and running tests. This example showed how to do it in TeamCity however it would follow a similar set up in Jenkins. If the TeamCity build agents were running in Azure then instead of creating the service principal, managed identities can be used. The service principal allows you to take advantage of container instances if the TeamCity server is running on-prem or elsewhere which gives great flexibility. I really like the container instance service and it’s a great addition to the resources offered by Microsoft on Azure.